Tips & Tricks
Precision Practices: Kerf and Tool Offset Adjustment
OMAX waterjet machines are designed for high-precision machining. A combination of meticulous mechanics, rigid construction, and velocity control from the software ensures the highest degree of precision in the parts. Even with all that precision built in, you, as the operator, are able to hone that precision further by implementing a few fundamental practices. Last month Precision Practices took a look at the concept of tool offset and why it is important. This month we’ll examine what happens when your tool offset grows and how to adjust your machining appropriately.

The mixing tube on your OMAX abrasive waterjet is made from ROCTEC composite carbide; however, it will wear with 60,000 psi of abrasive running through it. Below is the image of a mixing tube cross section. This mixing tube had been used for 152 hours. You can see the changing width due to the abrasive wear producing distortion throughout the tube.
This example is an extreme case. To maintain acute precision of your finished product, you should change out your mixing tube every 45 to 80 hours. Even in expected mixing tube use intervals, the accumulated barreling will affect your finished product as your jet stream will grow and deform causing your kerf to widen.
An abrasive jet stream may gradually acquire an elliptical shape, which causes the tool offset to vary by a few thousandths of an inch (hundredths of a millimeter), depending upon the orientation of the stream shape to the tool path.
This elliptical shape is usually due to uneven wear in the mixing tube and will tend to increase as your mixing tube wears out. This effect is not a function of the motion control equipment. Rotating your mixing tube 90° every 8 to 10 hours of cutting allows the mixing tube to wear more evenly and last longer.
Cutting test parts and doing kerf checks on a regular basis allows you to see when cutting performance begins to degrade. If not enough material is being removed (hole too small or part too large), decrease the tool offset by half the dimensional error observed. If too much material is being removed, increase the offset by half the dimensional error. By measuring parts as they are finished, you can monitor the wear of the mixing tube and periodically reset the tool offset to achieve more precise cutting.
Tip: Get in the habit of always measuring and setting the offset on every part you make. This will give you the practice needed to really make precise parts when they are called for, and give you an intuitive understanding of the capabilities of the machine.

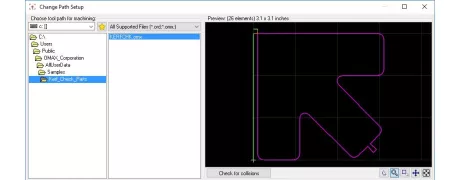
MAKE provides an OMX file, KERFCHK.omx, located at C:\Users\Public\OMAX_Corporation\AllUserData\Samples\Kerf_Check_Parts that is useful for measuring kerf and evaluating the quality of the jets stream.
When conducting a kerf check, always measure using a test part that is cut with the same cutting quality and material as will be used when cutting the actual part. If the part has many intricate geometries, expect that the kerf will be slightly wider based off cutting slower while decelerating into corners. Kerf width is a function of speed: the slower the nozzle cuts (higher quality number), the wider the kerf which requires a greater tool offset.
Once you have determined the kerf change, you will need to change your tool offset in MAKE. To change tool offset from MAKE, click on Change Path Setup and then look for the box titled Enter your Material Setup here. The field for Tool Offset is highlighted below. Adjust the numerical value of your offset and then update MAKE. When you preview your tool path, MAKE will alert you if there are any problem areas with your new configuration.
For more information on kerf and adjusting your offset, you can consult your OMAX Interactive Reference (OIR) that is available with the premium Intelli-MAX software package or check out the ProtoMAX KnowledgeBase.


